

Guide To CNC Chuck Jaws: Soft Jaws vs. Hard Jaws
soft jaws are more adaptable but wear out faster, while hard jaws are more durable but less flexible for customizing the fit of the workpiece. ...
Read More
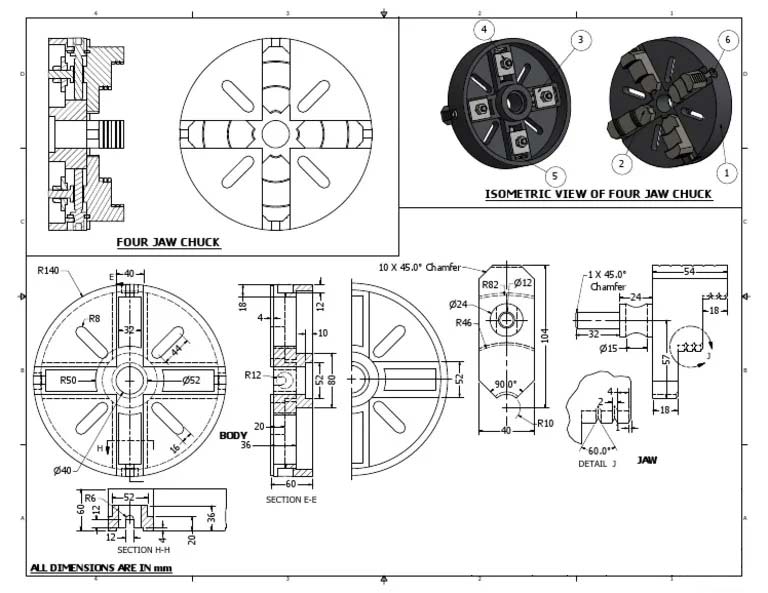
A 4-jaw chuck is a device commonly used on lathes to hold and rotate workpieces during machining. Its defining feature is its four jaws, which can be adjusted to grip objects of various shapes and sizes.
Independent 4-Jaw Chuck : Each jaw can be moved separately using a chuck key or wrench. This allows for highly precise alignment and secure gripping of irregular, square, hexagonal, or round workpieces.
Self-Centering 4-Jaw Chuck : All four jaws move simultaneously, centering the workpiece automatically—primarily used for square or round stock where speed of setup is more important than extreme precision.
Body : The central structure that houses the jaws and attaches to the lathe spindle.
Jaws : Four individual gripping mechanisms, each moving either independently or together, depending on the chuck design.
Adjustment Mechanism : Operated using a chuck key, handle, or screw that controls jaw movement. In independent chucks, each jaw is adjusted separately; in self-centering chucks, one central mechanism moves all jaws in unison.
Unplug the lathe and ensure all power sources are off before beginning.
Prepare a clean work area with enough space to organize and store hardware, fasteners, and chuck components.
Dismount the chuck from the lathe for easier handling and cleaning.
Initial Cleaning
Remove exterior chips, dust, and debris using a soft brush or compressed air.
Remove Jaws
Loosen each jaw by turning the jaw screws until the jaws are fully disengaged.
Slide each jaw out of its slot, typically one at a time, noting their positions (many chucks and jaws are numbered to fit specific locations).
Mark or document the order and orientation for reassembly.
Remove Jaw Assembly Components
For some models, remove the jaw-mounting screws with a hex key or screwdriver.
If there are stop screws or retainers (especially behind jaw 4 or in the rear), remove these as well.
Withdraw each jaw carriage or yoke in order (commonly 4, then 3, 2, 1).
(Optional) Further Disassembly
If you wish to perform a deep clean, you can remove internal snap rings or other retainers to split the chuck body—refer to your specific chuck’s manual.
Use snap ring pliers if necessary, and keep all small parts organized.
For models with retained jaw screws, sometimes the thrust “plug” or slug is pressed in from the rear; removal may require removing the backplate
Clean all parts: Use degreaser, solvent, brushes (old toothbrushes work well), and remove grease, chips, and debris.
Inspect for wear and damage: Check for cracks, especially in sockets or on the back of the body.
Lubricate moving components: Apply a dry lubricant such as PTFE to all sliding surfaces, and wipe off any excess.
Polish any sharp or moving surfaces as needed, but avoid excessive removal of material.
Reinstall jaw carriages/yokes according to their original order (reverse of removal). Start with 1, 2, 3, then 4.
Make sure each jaw and screw matches its original slot to ensure a smooth fit and proper operation.
Replace any snap rings or retainers securely.
Remount the chuck to the lathe and check function carefully before use.
Test the action of each jaw to ensure smooth operation.
Use a brass drift and tap gently to remove stuck components.
Mark positions of major assemblies to preserve alignment (e.g., backplate to chuck body) and avoid loss of concentricity.
When handling snap rings, wear safety glasses and contain parts to avoid injury or losing components.
Do not force parts; if something doesn’t come loose easily, reassess to avoid damage.
Decades of built-up grime may require soaking screws and parts in solvent before removal.
Some chucks may have uniquely retained jaw screws—inspect carefully before attempting removal.
If threads or fits seem non-interchangeable, match parts by hand until the best smooth fit is found.
Always refer to your manufacturer’s manual for model-specific guidance if available.

soft jaws are more adaptable but wear out faster, while hard jaws are more durable but less flexible for customizing the fit of the workpiece. ...
Read More2-jaw chuck is a specialized type of chuck designed for holding and securing irregularly shaped or asymmetrical workpieces during machining processes. ...
Read More4-Jaw Chuck is a type of chuck, which is a clamping device used to secure a workpiece on a lathe or other machining equipment. ...
Read MoreA hydraulic chuck is a precision tool holder widely used in machining operations for its high accuracy, excellent grip force, and vibration damping capabilities. It operates using hydraulic pressure to clamp the cutting tool securely. This article will explain the working principle, advantages, and applications of hydraulic chucks....
Read MoreThe CNC lathe power chucks main types include pneumatic chucks, which use compressed air for quick and efficient operation, and hydraulic chucks, known for their high clamping force and precision....
Read More
3 jaw chuck is a self-centering device with three jaws that grip round or hexagonal workpieces simultaneously, facilitating quick and reasonably accurate machining setups on lathes and similar tools....
Read MoreThis guide provides a more in-depth look into rotary cylinder actuators, offering technical insights into their types, applications, design components, operating principles, and maintenance practices. ...
Read MoreRotary cylinders are actuators that convert pneumatic or hydraulic energy into rotational motion. They are crucial in industries where rotary motion is needed but linear actuators would be inefficient....
Read More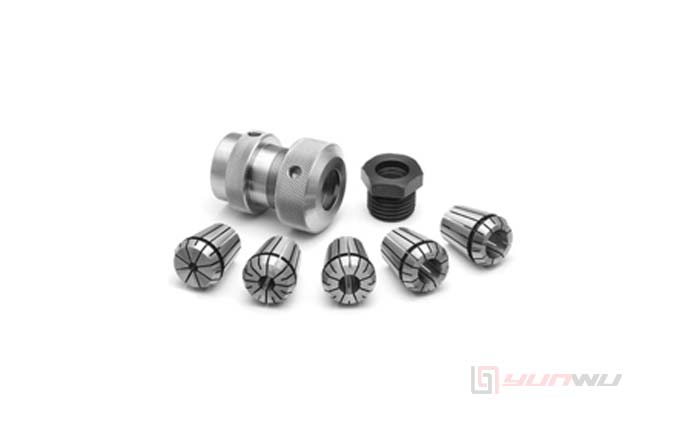
A collet chuck is a specialized clamping device used in machining and other applications to hold workpieces or cutting tools securely. ...
Read MoreCommon types include pneumatic rotary actuators, which use compressed air; hydraulic rotary actuators, powered by fluid pressure; electric rotary actuators, which use electrical energy; Each type offers specific advantages based on force, speed, and control precision....
Read MoreRotary index table, also known as a indexing table, is a precision mechanical device that facilitates the rotational positioning of workpieces in machine tools and automated systems....
Read More
Among the various types of lathe chucks, the 3-jaw and 4-jaw chucks are the most commonly used. Each type has distinct characteristics, advantages, and limitations that make it suitable for specific applications....
Read More
Get A Quote
Get A Free Consultation
Please feel free to get in touch using the form below.We shall reply within the following 24hrs.