

Guide To CNC Chuck Jaws: Soft Jaws vs. Hard Jaws
soft jaws are more adaptable but wear out faster, while hard jaws are more durable but less flexible for customizing the fit of the workpiece. ...
Read More
Properly centering a workpiece in a 4-jaw lathe chuck is an essential skill for precision machining. Unlike a 3-jaw chuck, each jaw on a 4-jaw chuck moves independently, allowing you to hold both round and irregular shapes—but requiring manual alignment. Here is a step-by-step guide:
Place your workpiece between the jaws.
Use the grooves on the face of the chuck to visually estimate the center position.
Adjust jaws so the piece is approximately centered and just snug, but not fully tightened.
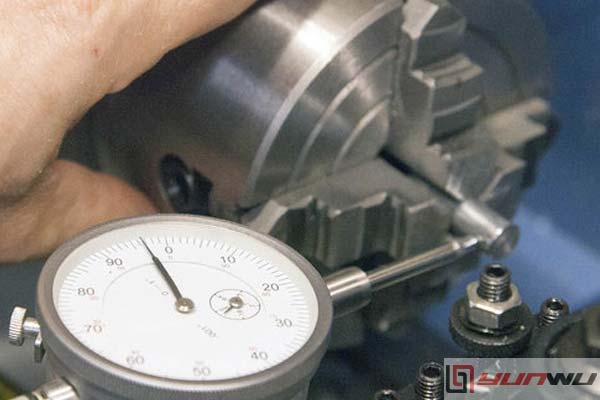
Position a dial indicator (DI) against the workpiece surface.
A magnetic base can hold the indicator in place—aim for the contact point to be perpendicular to the surface being tested.
Set the indicator to zero at your starting position.
Slowly turn the chuck by hand.
Watch the dial indicator: note the highest (maximum) and lowest (minimum) readings as the workpiece rotates.
Adjust the two jaws closest to the highest and lowest readings by moving one in and the other out by equal amounts, aiming to halve the eccentricity.
Only adjust two opposing jaws at a time—think of the process as like working with two 2-jaw chucks, since adjustments along one axis minimally affect the other axis.
Swing the chuck 180° and re-check with the dial indicator. The runout should be reduced.
Repeat for the other pair of jaws, correcting the other axis.
Continue to alternate jaw adjustments and check runout, progressively refining the alignment.
Each reduced runout should be closer to zero.
With practice, centering to within ±0.001" runout is achievable in just a few minutes.
Once satisfied with the centering, securely tighten all jaws.
Recheck with the dial indicator to ensure the workpiece has not shifted.
For workpieces with marked centers, aligning the punch mark with a tailstock center can speed up the process.
Always use the dial indicator for precise alignment—visual centering is only for roughing in.
Adjust jaws in small increments; large movements tend to overcorrect.
Double-check all jaws are firmly tightened when finished, as a loose jaw can ruin centering.
When working with offset holes or specific features, center those features rather than the outer surface.
| Step | Action | Tool Required |
|---|---|---|
| Rough Centering | Eyeball and snug workpiece in jaws | None |
| Initial Measurement | Place dial indicator and check runout | Dial indicator |
| Jaw Adjustment | Incrementally move opposing jaws | Chuck wrenches |
| Fine Tuning | Repeat measurements and adjustments | Dial indicator |
| Final Verification | Tighten jaws, recheck concentricity | Chuck wrenches |
By following this structured approach, you can quickly and accurately center workpieces in a 4-jaw chuck, even as a beginner.

soft jaws are more adaptable but wear out faster, while hard jaws are more durable but less flexible for customizing the fit of the workpiece. ...
Read More2-jaw chuck is a specialized type of chuck designed for holding and securing irregularly shaped or asymmetrical workpieces during machining processes. ...
Read More4-Jaw Chuck is a type of chuck, which is a clamping device used to secure a workpiece on a lathe or other machining equipment. ...
Read MoreA hydraulic chuck is a precision tool holder widely used in machining operations for its high accuracy, excellent grip force, and vibration damping capabilities. It operates using hydraulic pressure to clamp the cutting tool securely. This article will explain the working principle, advantages, and applications of hydraulic chucks....
Read MoreThe CNC lathe power chucks main types include pneumatic chucks, which use compressed air for quick and efficient operation, and hydraulic chucks, known for their high clamping force and precision....
Read More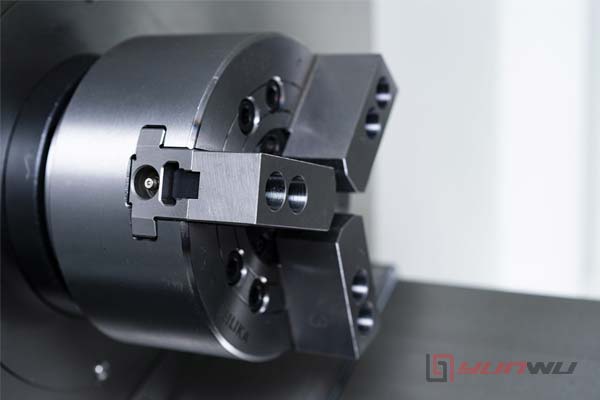
3 jaw chuck is a self-centering device with three jaws that grip round or hexagonal workpieces simultaneously, facilitating quick and reasonably accurate machining setups on lathes and similar tools....
Read MoreThis guide provides a more in-depth look into rotary cylinder actuators, offering technical insights into their types, applications, design components, operating principles, and maintenance practices. ...
Read MoreRotary cylinders are actuators that convert pneumatic or hydraulic energy into rotational motion. They are crucial in industries where rotary motion is needed but linear actuators would be inefficient....
Read More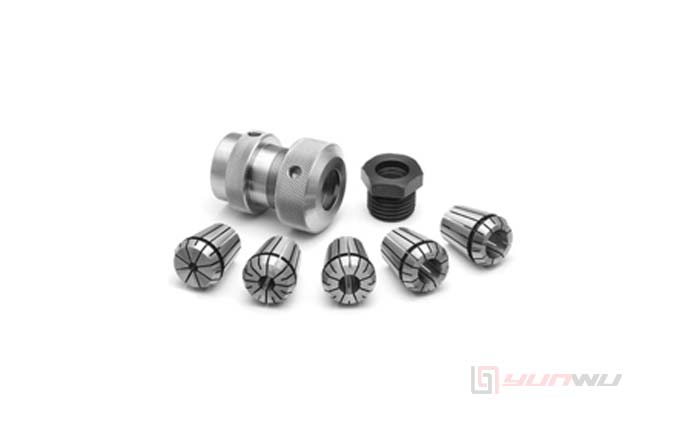
A collet chuck is a specialized clamping device used in machining and other applications to hold workpieces or cutting tools securely. ...
Read MoreCommon types include pneumatic rotary actuators, which use compressed air; hydraulic rotary actuators, powered by fluid pressure; electric rotary actuators, which use electrical energy; Each type offers specific advantages based on force, speed, and control precision....
Read MoreRotary index table, also known as a indexing table, is a precision mechanical device that facilitates the rotational positioning of workpieces in machine tools and automated systems....
Read More
Among the various types of lathe chucks, the 3-jaw and 4-jaw chucks are the most commonly used. Each type has distinct characteristics, advantages, and limitations that make it suitable for specific applications....
Read More
Get A Quote
Get A Free Consultation
Please feel free to get in touch using the form below.We shall reply within the following 24hrs.